LSTC - Lenovo Service Tool Center – Main interface intrduce
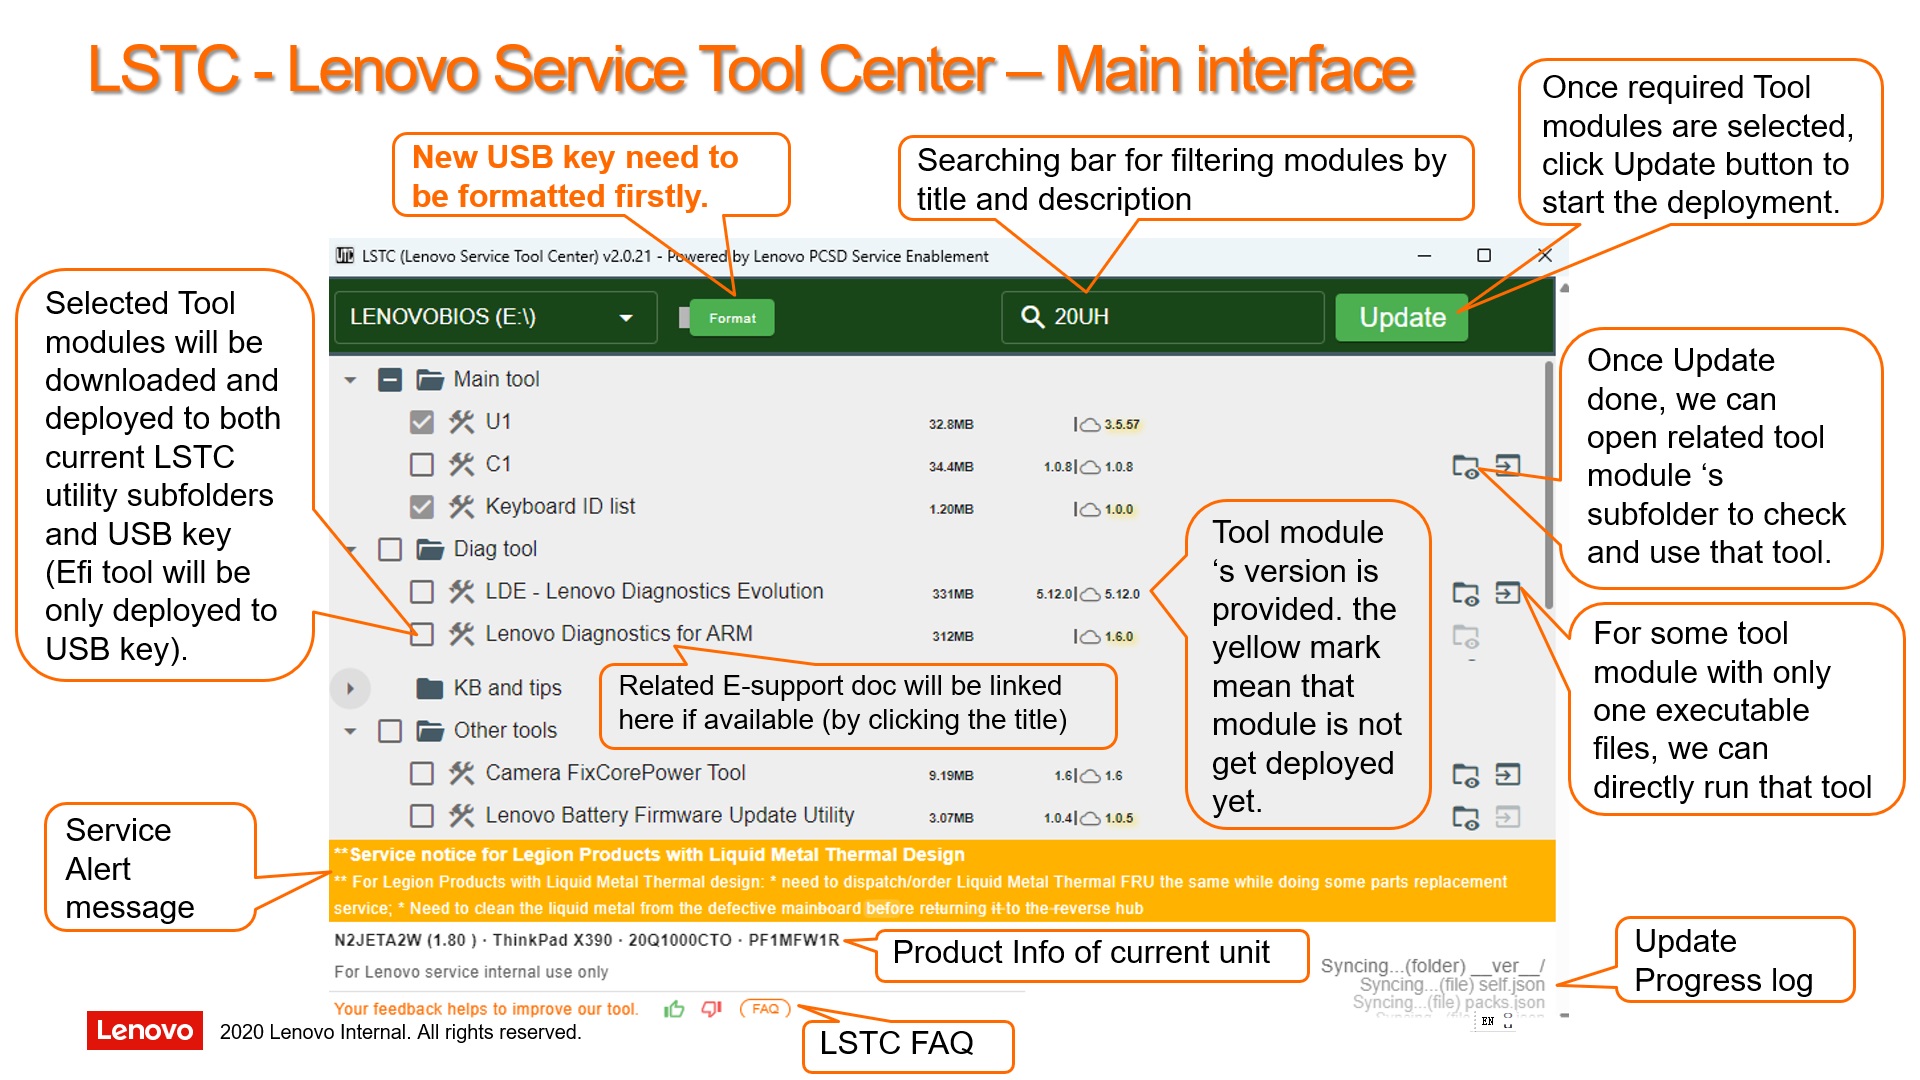
By selecting related module items and clicking the 'Update' button, LSTC tool will download latest U1 package,
Diagnostic tools and other useful tools as BIOS tool, panel fireware tool, etc. and get them deployed
in USB key for later usage.
LSTC tool will get itself deployed into the USB, please go check LSTC utility in USB sub folder: 'LSTC_TOOL'.

The suggested size of USB stick to install minimal and full set of features of LSTC:
** minimal size 4GB: (all tools installed/deployed, but without C1 crisis bios packages).
** full size 9GB:(all tools installed/deployed, with all C1 crisis bios packages).
The package cache feature of LSTC(and C1 tool):
** All packages will be cached in an cache sub folders of LSTC, while another USB is connected,
LSTC will check the cached package’s version information and deploy from the cache folders if the version no issues,
instead of downloading it from server side each times.
So, it is better to run LSTC on your working unit's hard drive side, instead of running it in USB.
Anyway, 2 USB scenario also will work.
** for C1, if you want to get C1 crisis packages cached for deploying to other USB, need:
--> run LSTC w/o USB-->click and running C1 inside LSTC w/o USB -->
once C1 launched-->plugin target USB --> start C1 Update
Why need to format the USB key/device via the LSTC format button:
** If you do not format your USB key as required by the provided 'format tool', the ThinkPad Maintenance Utility will
enter "Read Only" mode and you can view, but cannot change anything.
the error message will like: TpReadEEPROMBlock : Write access to Block#84 is denied...
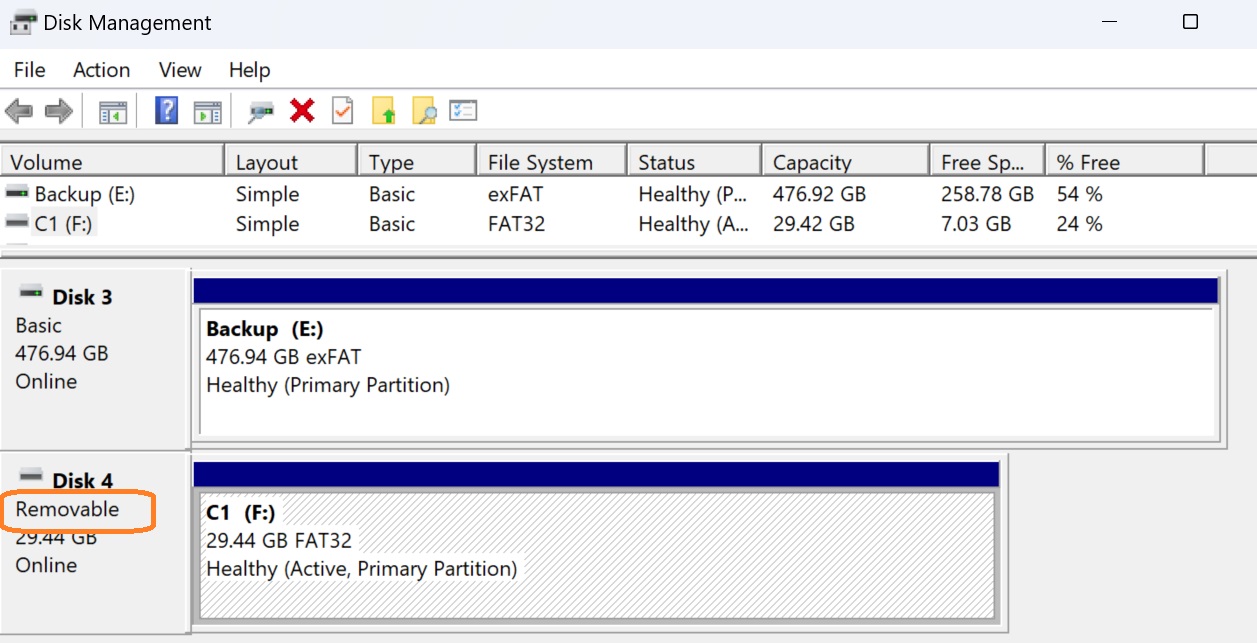
Not all connected USB key/device are recognized/accepted:
only Removable USB device can be supported by LSTC tool, as it is ThinkPad Maintenance Utility 's limitation.
Refer to figure:

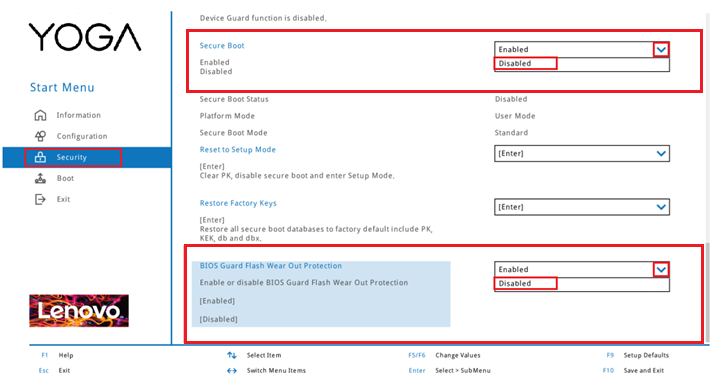
Need to disable "Secure boot" and BIOS Guard Flash Wear Out Protection" before U1/C1 running.
Except for "Secure boot", "BIOS Guard Flash Wear Out Protection" is also enabled by default for most products(include ThinkBook) shipped since 2024, servicer need to disable this option in BIOS Setup before using BIOS tool(U1).
* and be sure enable this option after SN/MTM injection.
* Error/Notice message can be like -> "Warning : Region is locked." or "Variable is read only."
Refer to below example for BIOS Setup:

Update button is gray and not work:
LSTC tool could launch without network connection, related Update feature will be disabled,
once network is connected, need to launch LSTC tool again to enable the Update button.
also, an connected USB key is required the same.
No access right to LSTC alert and KB tips link:
Most alert doc and the KB tips is lenovo servicer only tips, need to have e-support servicer access right to view related tips doc,
related e-support access right issue, please ask for help from region/geo support team.
Sunset arrangement for original U1 update utility:
Field team still able to use the origianl U1 update utility to get latest U1 package and
Lenovo Diagnostics tool (Linux and EFI version) package.
U1 support team will stop maintaining new package for U1 update utility one year later(around Aug 2024).
LSTC inside tool list:
U1
C1
Keyboard ID list
Lenovo Diagnostics Windows (64-bit)
Lenovo Diagnostics Windows (ARM)
Lenovo Diagnostics Linux (X64)
Lenovo Diagnostics UEFI (X64)
Lenovo Diagnostics UEFI (ARM)
Lenovo ThinkStation Diagnostics
Channel ID write tool - Lenovo Tab K11
Camera FixCorePower Tool
Panel FW Tool - AUO
Panel FW Tool - Legion Pro 5 16ARX8
Panel FW Tool - Legion S7 16APH8
RPMC Rebinding Tool - Legion T5 26ARA8
RPMC Rebinding Tool - Legion T5 26ARA8
Battery Firmware Update Utility
Battery Firmware Update Utility
E-ink_Test_Tool - Thinkbook Plus
E-ink_Test_Tool - Thinkbook Plus G2
E-ink_Test_Tool - ThinkBook Plus G3
E-ink_Test_Tool - ThinkBook Plus G4
iobox - ThinkCentre M90n-1
Mac address data sync tool - E series
BIOS Tool - IdeaPad Slim 5 14Q8X9 (ARM)
BIOS Tool - IdeaPad 5 2-in-1 14Q8X9 (ARM)
BIOS Tool - ThinkBook 16 G7 QOY (ARM)
BIOS Tool - Yoga Slim 7 14Q8X9 (ARM)
BIOS Tool - IdeaPad 5G 14Q8X05 (ARM)
BIOS Tool - Legion S7 16IAH7
BIOS Tool - Yoga 5G-14Q8CX05 (ARM)
BIOS Tool - Lenovo 10w (ARM)
BIOS Tool - Miix 630-12Q35 (ARM)
BIOS Tool - ThinkEdge SE70 (Linux)
NVMe SSD Firmware - ThinkPad
NVMe SSD Firmware - ThinkPad Z16 Gen 1
NVMe SSD Firmware - Samsung PM9A1
NVMe SSD Firmware - UMIS
NVMe SSD Firmware - Solidigm (Intel)
NVMe SSd formware - WDC SN740
NVMe SSD Firmware - Kioxia BG5
X-Rite Color Assistant - Ideapad
X-Rite Color Assistant - ThinkPad
LSTC WW training:
LSTC Lenovo Service Tool Center (CSWi22S)
LSTC U1 C1 tool update notice:
Field team can refer to below update notcie to know latest LSTC U1 C1 information
LSTC U1 C1 tool update notice
LSTC issue and suggestion feedback channel:
Field team can directly send email to LSTC owner Muyi ZZ7 Yang by email address : yangzz7@lenovo.com,
Any feedback & comments are welcome and most appreciated.
PS: U1 tool FAQ:
* 1. How to know if U1 tool is outdated and related download link(servicer access ID is required)
A: Field team can refer to below update notcie to know latest U1 verison information
LSTC U1 C1 tool update notice
A: if the U1 update utility version is too old to get latest U1 package, please try get the latest U1 update utility or try above LSTC utility:
U1 Update software for Golden Key U1 BIOS Tool
LSTC - Lenovo Service Tool Center Utility
* 2. How to handle related injection issue, such as: System board erase may not done properly, motherboard is DOA for which details are not getting updated, or UUID mapping issue or Mac ID is not getting updated.
A: U1 tool injection feature issue, such as injection failure(SN# updated and MTM is not getting updated) or product not supported, please directly send email to LSTC and U1 tool owner Muyi ZZ7 Yang by email address : yangzz7@lenovo.com, better with U1 snapshot or target product 's Product name and BIOS ID(detail BIOS version information)
A: Other related issues, suggestion go standard technical escalation to get help from L2 or parts team
* 3. How to use the U1 's Windows PE booting feature(only WIM version WIndows PE image is supported, ISO image is not supported)
A: U1 has related Windows PE booting feature provided, but as limitation as we can not provide/deliver any Windows PE image with U1 package and LSTC,
service engineer need to provide Windows PE byself --> put it in proper subfolder inside U1 USB & rename the Windows PE image as required,
Then, we can boot related Windows PE via U1 's boot menu items directly under EFI shell
Notice for using this WinPE boot entry:
__1. The default boot manager BCD file is placed in [X:]\EFI\MICROSOFT\BOOT\ .
__2. You need create the required folder in the USB key by yourself manually.
__3. You need copy the required WinPE WIM file into above folder by yourself manually.
__4. We allow below combinations of the folder name and the WIM file name:
____1) boot.wim with path [X:]\\sources\boot.wim
____2) winpe.wim with path [X:]\\sources\winpe.wim
____3) LiteTouchPE_x64.wim with path [X:]\\sources\LiteTouchPE_x64.wim
____4) winpe64.wim with path [X:]\\TVTOS\winpe64.wim
_____* You need rename your WIM file if its original file name is not in above.
__5. You may copy other folders and files of your WinPE to the same USB key if needed.
* 4. U1 may not be recognized by some products as the USB key is not able to got showing in the BIOS booting list
A: U1 tool related USB key need to be formatted by provided formatting feature inside LSTC or U1 update utility, this is required by ThinkPad Maintenance Utility. thus, issue reported as some particular USB key brand formatted by LSTC/U1 Utility will have this issue on particular products
Suggestion go standard technical escalation to get help from L2 and related Product RD team
So far, the only workaround from U1 side is format the USB key by other common third part formatting utility to FAT32 format, then, use U1 utility or LSTC to update / deploy U1 modules to the USB, thus, the USB and U1 will able to work on that particular product, but the ThinkPad Maintenace Utility will not work anymore on any ThinkPad(suggest to create a new USB only for products with this issue)
* 5. After U1 USB stick formatted by Usbfmtpw utility, device always boots from U1 USB stick instead of SSD with the OS even though the Windows Boot Manager is in the first place, which means didn't follow BIOS boot order settings.
A: This is work as design. As long as the USB is formatted by the Usbfmtpw utility, when the machine connects the USB, the machine will boot from the formatted USB at the 1st priority regardless of boot order settings.
Usbfmtpw is a tool that creates a USB Memory that can be booted with top priority regardless of the BootOrder. BIOS contains code that recognizes the format created with Usbfmtpw and prioritizes the boot of that device. This code is not affected by the USB capacity or format size and does not change the BootOrder. The BIOS simply gives top priority to boot attempts, and the boot mechanism is no different from that of a normal UEFI.
* 6. U1 tool tips:
A: It detects Platform by default and execute ThinkPad Maintenance Utility for ThinkPad Machines and Golden key Tool for Other Products Like ThinkBook and Desktops.
Following QR Codes can(inside below U1 tips) be scanned for instruction videos.
Golden Key U1 BIOS Tool for UEFI BIOS - Lenovo Notebook, Desktop and Think Product
PS: C1 tool FAQ:
* 1. System BIOS Crisis Release Notification - Crisis BIOS SOP
A: [Procedure]:
1. Shutdown the system and plug in AC.
2. Insert the bootable device.
3. Press Fn + R.
4. Power on the unit.
5. Release Fn + R.
6. The process of Crisis runs automatically.